Vagrantの入門
更新日 : 2019年09月18日
VagrantのインストールとVirtualboxのインストールが完了したら、Vagrantの入門を早速行っていきましょう。今回の入門は公式サイトに基づいて説明します。
この入門を行ってVagrantの基本動作について学び、様々な仮想環境を作成できるようになっていきましょう。
仮想マシンの初期設定ファイル追加
ターミナルまたはコマンドプロンプトを起動し、Vagrantから仮想マシンを作るために、初期設定ファイルを作成しましょう。
- ターミナルまたはコマンドプロンプトを起動し、任意の場所にフォルダを作成
まずは任意の場所にフォルダを作成しましょう。記事中ではデスクトップにフォルダを作成しました。
# デスクトップへ移動 $cd Desktop # 移動した場所(デスクトップ)でtest-vagrantというフォルダを作成 $mkdir test-vagrant - 作成したフォルダに移動し、初期設定ファイル作成コマンドを実行
フォルダを作成したら作成したフォルダへ移動し、Vagrantで初期設定ファイルを作成しましょう。
# 作成したフォルダへ移動
$cd test-vagrant
# 初期設定ファイルを作成
$vagrant init
A `Vagrantfile` has been placed in this directory. You are now
ready to `vagrant up` your first virtual environment! Please read
the comments in the Vagrantfile as well as documentation on
`vagrantup.com` for more information on using Vagrant.
vagrant initコマンドを実行すると、Vagrantfileという初期設定ファイルが作成されます。これはFinderなどで確認できるので見ておきましょう。
boxの追加
Vagrantfile(初期設定ファイル)が作成されたところで、続いてはboxを追加していきます。
仮想マシンを導入する際に、Vagrantで必要なのがboxです。boxとは、仮想マシンの素が入っているファイルのことです。麻婆豆腐などを作る際に豆腐と麻婆豆腐の素だけを買って簡単に調理することができるように、仮想マシンもboxという仮想マシンの素をダウンロードし、そこから作りたい仮想マシンを作成します。
ではターミナルまたはコマンドプロンプトでそのboxを追加するコマンドを実行しましょう。
# hashicorp/precise64というboxを追加
$vagrant box add hashicorp/precise64
==> box: Loading metadata for box 'hashicorp/precise64'
    box: URL: https://vagrantcloud.com/hashicorp/precise64
This box can work with multiple providers! The providers that it
can work with are listed below. Please review the list and choose
the provider you will be working with.

1) hyperv
2) virtualbox
3) vmware_fusion

Enter your choice: 2コマンドを実行すると、どの仮想環境構築ツールのboxを追加するか聞かれます。Enter your choice:の右側に数字を入力し、選択します。本記事ではVirtualboxを利用しているので、2と入力しEnterを押します。
==> box: Successfully added box 'hashicorp/precise64' (v1.1.0) for 'virtualbox'!このような文字が最後に出力されれば、box追加は完了です。
今回はvagrant box add hashicorp/precise64というコマンドを実行しました。これはhashicorp/precise64というboxを追加するというコマンドです。
普通はboxのダウンロードURLが必要で、boxにも任意の名前をつける必要があります。
vagrant box add [box名] [ダウンロードURL]とすることでboxを追加することができます。boxのダウンロードURLの一覧はvagrantbox.exのサイトから取得できます。
Vagrantfileの編集
Vagrantfileには、どのboxを利用するかを設定する項目があります。先程hashicorp/precise64というboxを追加したので、そのboxを利用する設定に変更しましょう。
適当なエディタでVagrantfileを開きましょう。
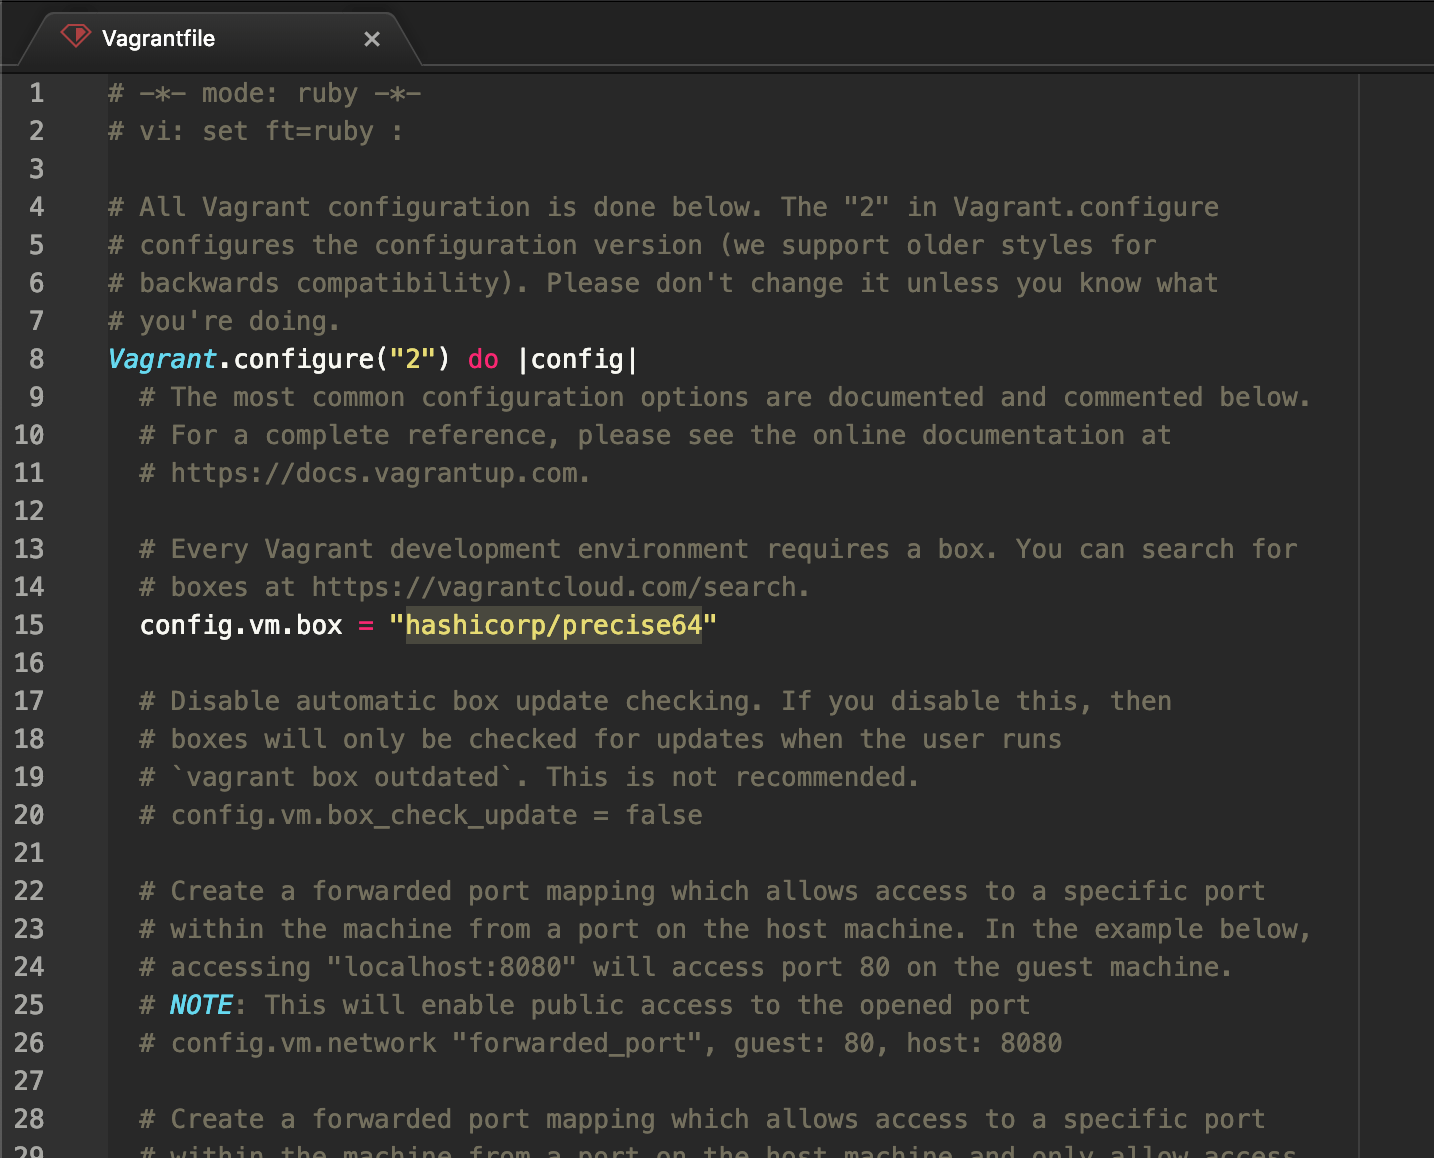
画像のように15行目のconfig.vm.box = "base"という部分を、config.vm.box = "hashicorp/precise64"に変更し、保存して編集を終了します。これで使用するboxが決定しました。
仮想マシンの作成
いよいよ仮想マシンを構築する準備が整ったので、仮想マシンを作成・起動します。
# vagrant upコマンドだけで作成・起動できる
$vagrant up
Bringing machine 'default' up with 'virtualbox' provider...
==> default: Importing base box 'hashicorp/precise64'...
==> default: Matching MAC address for NAT networking...
==> default: Checking if box 'hashicorp/precise64' version '1.1.0' is up to date...
==> default: Setting the name of the VM: test-vagrant_default_1566738787906_13912
==> default: Clearing any previously set network interfaces...
==> default: Preparing network interfaces based on configuration...
    default: Adapter 1: nat
==> default: Forwarding ports...
    default: 22 (guest) => 2222 (host) (adapter 1)
==> default: Booting VM...
==> default: Waiting for machine to boot. This may take a few minutes...
    default: SSH address: 127.0.0.1:2222
    default: SSH username: vagrant
    default: SSH auth method: private key
    default:
    default: Vagrant insecure key detected. Vagrant will automatically replace
    default: this with a newly generated keypair for better security.
    default:
    default: Inserting generated public key within guest...
    default: Removing insecure key from the guest if it's present...
    default: Key inserted! Disconnecting and reconnecting using new SSH key...
==> default: Machine booted and ready!
==> default: Checking for guest additions in VM...
    default: The guest additions on this VM do not match the installed version of
    default: VirtualBox! In most cases this is fine, but in rare cases it can
    default: prevent things such as shared folders from working properly. If you see
    default: shared folder errors, please make sure the guest additions within the
    default: virtual machine match the version of VirtualBox you have installed on
    default: your host and reload your VM.
    default:
    default: Guest Additions Version: 4.2.0
    default: VirtualBox Version: 6.0
==> default: Mounting shared folders...
    default: /vagrant => /Users/~~~/Desktop/test-vagrant
vagrant upコマンドを実行すると、下に色々出力されます。基本的にはこれで作成・起動完了です。きちんと起動しているか確認してみます。
# vagrant statusを実行
$vagrant status
Current machine states:

default                   running (virtualbox)

The VM is running. To stop this VM, you can run `vagrant halt` to
shut it down forcefully, or you can run `vagrant suspend` to simply
suspend the virtual machine. In either case, to restart it again,
simply run `vagrant up`.
vagrant statusコマンドを、Vagrantfileが存在する場所で実行すると、仮想マシンの状態を把握できます。上のようにrunningと表示していれば起動状態になっています。
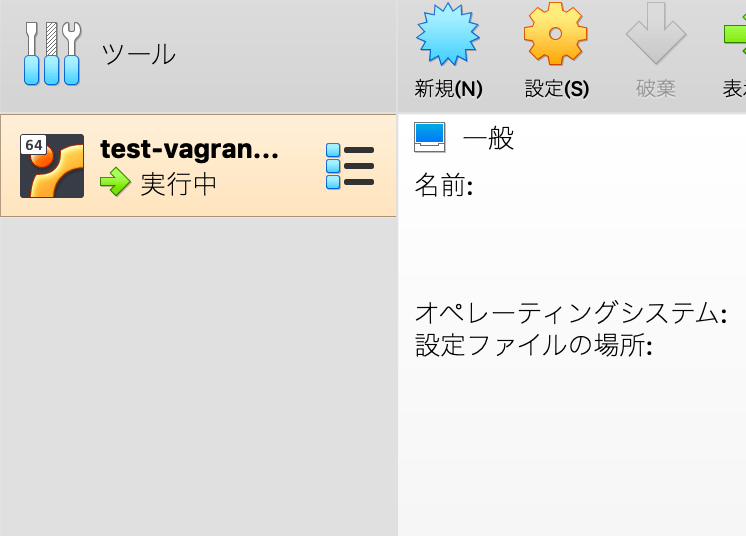
Virtualboxのアプリを立ち上げて見てみると、下の画像のように仮想マシンが起動していることを確認できます。
仮想マシンへログイン
仮想マシンを起動することができましたが、仮想マシンを直接操作できなければPCの中に仮想的なPCがあるだけで何もできないので、仮想マシンの中に入り込んでみましょう。(ログイン)
$vagrant ssh
Welcome to Ubuntu 12.04 LTS (GNU/Linux 3.2.0-23-generic x86_64)

 * Documentation:  https://help.ubuntu.com/
New release '14.04.6 LTS' available.
Run 'do-release-upgrade' to upgrade to it.

Welcome to your Vagrant-built virtual machine.
Last login: Fri Sep 14 06:23:18 2012 from 10.0.2.2
vagrant@precise64:~$
vagrant sshコマンドをVagrantfileがある場所で実行すると、実行中の仮想マシンの中に入ることができます。一番下にvagrant@precise64:~$と出ていますが、仮想マシンの中に入り、仮想マシンの中でコマンドを待機している状態になっています。
また、vagrant sshコマンド以外でも仮想マシンへログインすることがあるので、下記に必要なユーザー名とパスワードを表記します。
| ユーザー名 | パスワード |
|---|---|
| vagrant | vagrant |
| root | vagrant |
もちろん取得するboxや作成する仮想マシンによって異なるパスワードが設定されていることがありますが、Vagrantの公式では上記のようなユーザー名・パスワードでboxを作成するように書かれています。
仮想マシンは普段操作しているPCと別のPCが中に存在する状態です。仮想マシンは起動・操作・終了・破壊などを自由にできます。
仮想マシンの中から出る際にはexitコマンドやlogoutコマンドを実行してください。
最後に仮想マシンを終了・破壊
仮想マシンが立ち上がり、自由に操作できることがわかったので、仮想マシンを終了し、もうやることはないので作成した仮想マシンを破壊してしまいましょう。
仮想マシンのメリットはこのように自由にコンピュータを作成・起動・操作・破壊ができることです。
好きな環境をインストールし、好きなことをやり、要らなくなったら破壊や終了できます。
# vagrant haltで起動している仮想マシンを終了
$vagrant halt
==> default: Attempting graceful shutdown of VM...
vagrant haltコマンドをVagrantfileが存在する場所で実行すると、起動している仮想マシンをシャットダウンすることができます。
シャットダウンしただけで、仮想マシン内で作成したデータなどは残っている状態です。vagrant upコマンドで再度起動できます。
終了後、仮想マシンを破壊します。
# vagrant destroyで仮想マシンを破壊(削除)
$vagrant destroy
    default: Are you sure you want to destroy the 'default' VM? [y/N] y
==> default: Destroying VM and associated drives...
vagrant destroyコマンドをVagrantfileが存在する場所で実行すると、存在する仮想マシンを破壊(削除)することができます。
コマンドを実行すると、default: Are you sure you want to destroy the 'default' VM? [y/N] と聞かれます。本当に削除して良いか聞いています。yを押してEnterを押すと削除されます。
仮想マシンを破壊したので、仮想マシン内で作成したファイルなどは削除されます。
vagrant upを実行すれば再度仮想マシンを作成・起動することができます。ただしvagrant destroyは仮想マシンを破壊(削除)するので、破壊前に仮想マシン内で作成したファイルなどはもちろん戻りません。
まとめ
Vagrantの入門として、設定ファイルの追加・boxの追加・設定ファイルの編集・仮想マシンの起動・仮想マシンへログイン・仮想マシンのシャットダウン・仮想マシンの破壊まで行いました。
今回の入門がVagrantの基本となってきます。他にもコマンドや設定はたくさんありますが、基本はこの入門で行った操作と変わりません。
vagrant statusをVagrantfileが存在する場所で実行すると、仮想マシンの状態が把握できるので、今の状態がわからなくなったら実行するようにしましょう。
また、仮想マシンの操作コマンドは基本的にはVagrantfileが存在する場所で行うことに注意しましょう。box関連の操作は例外で、Vagrantfileがなくても追加や削除などができます。